
Wood polymer composite material WPC (Wood Plastic Composite) products storage and installation instructions.
DEAR CUSTOMER!
Thank you for choosing one of our WPC products!
This installation instruction is applicable only for Eco Terrace wood polymer composite products to storage and install.
Please read carefully the installation instructions before you start with the installation process.
DISCLAIMER.
Precautions for use.
Eco Terrace products should be stored, handled and used in accordance with good hygiene practices and in conformity with all appropriate legal regulations and responsibilities. It is the responsibility of the customer to properly and effectively assess possible risks associated with the use of our products. For the safe use of Eco Terrace products please refer to the storage and
installation instructions.
GENERAL INFORMATION.
Eco Terrace WPC products are made from wood polymer composite, containing 60% of natural wood. Superior quality raw materials – natural wood, plastic and coloring are used to produce WPC products. Producing WPC products, we try to make the surface of boards reminiscent of a natural tree. As in nature there are no totally identical things, we are not trying to produce absolutely identical boards. Minor differences exist in the structure of the surface and a depth of grooves, which are characteristic of natural wood boards. During storage and transportation of WPC materials, they can lean a little lean, but they are easy to straighten or unbend before the installation process. During the WPC terrace /plank boards manufacturing process, the surface is polished to a given direction. If adjacent boards are placed with opposite grinding axes they can be visually different.
Before the board installation, place them next to each other. If any of the boards are significantly different from the others, its direction must be changed to the opposite. Both Eco Terrace boards sides are polished equally and any of them can be used as an outer side or surface.

Eco Terrace WPC boards can saw and drill using conventional woodworking tools – hand saw, hacksaw, electric saw blade, wood borers. It is preferable to use the hard alloy saw blade teeth. During the installation process wear protective glasses and take care of work safety. Follow all installation instructions, especially specified widths of gaps between the boards, as well as gaps between the boards and a stationary object (such as house wall). To get nice equal gaps between the longitudinal terrace boards, use WPC fixing clips offered by Eco Terrace. Wood polymer composite boards in the sun warms up and expands and when it cools down it contracts. It is important that the temperature during the board installation process changes not more than 5° C degrees, because after temperature equalisation, original equal board gap widths may appear with slight differences.
Before terrace installation WPC boards must be stored on flat surface in the shade for at least 12 hours.
TERRACE INSTALLATION
1. PREPARATION PROCESS
Before starting the installation process, make sure that all the necessary components of terrace installation are in the package you purchased from your dealer.
Important things which must be done and taken into account before starting the installation process:
• Carefully unpack all necessary materials from the packaging;
• Make sure that the surface for new terrace installation is clean and free from unnecessary materials;
• Create terrace main support structure with a slight slope (1,5 ° – 2 ° angle), to facilitate water drain from the surface of the terrace;
• Terrace main support construction must be made taking into account that air must freely circulate under the new terrace.
• Main support construction must be precise and all materials (if not used Eco Terrace support logs) must be of best quality;
• All terrace support construction faults, inaccuracies and distortion will reflect in the terrace surface quality;
• Do not use the Eco Terrace terrace boards for creating main support structure in terrace construction!
• Creating terrace main support construction, please consider and note all relevant building standards!
2. TERRACE SUPPORT RAILS ASSEMBLY USING ECO TERRACE RAILS.
Use of support rails are permissible only if the new terrace will be built on seamlessly firm, level surface, such as concrete, flat roof, etc. The surface must be flat and with little inclination to avoid accumulation of the water. Rails must be placed directly on the flat surface so that they do not interfere with the water drain. If the terrace boards will be fixed perpendicular to the support rails, the maximum distance between the support rails is 40 cm. If the terrace will be exposed to high load (furniture, a lot of people), the recommended spacing between the support rails is 30 cm. If the terrace boards will be fixed in the angle (45 ° angle to the support rails), the distance between the support rails should be decreased.

When two boards are laid end to end, two support rails must be placed where they meet and separate fixing clips must be used to each support rail.

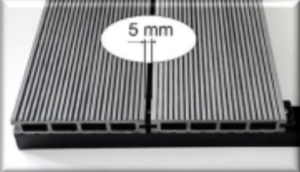
Both support rails must be bolted together with usual wood screws. This is important as terrace boards expand and contract with changes in temperature. Logs (if possible) must be attached to the surface with dowels and screws. Holes must be pre-drilled in the rails to attach them to surface. If the rail is placed next to each other between the ends, a gap of 5 mm must be left. The same gap must be left between the end of the rails and a stationary object (such as a home wall).
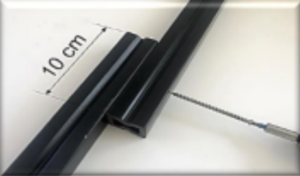
If the surface of installing terrace can`t be drilled, rails can be placed on surface without any attachment. In this case, the ends of the rails must be placed next to each other (10 cm together) and screwed together. At this connection the terrace boards must be screwed to both rails.
When assembling Eco Terrace boards, the distance between boards must be 5 mm. Equal gaps between the longitudinal terrace boards are possible with Eco Terrace offered WPC fixing clips. Such mounting gives the possibility to remove boards even in the middle of terrace and place them back without disrupting the entire terrace floor. To remove some objects, which felt into gap, you need to unscrew minimum least 4 boards and simultaneously remove them.
When two boards are laid end to end the gap between the boards must be at least 5-10 mm and this distance depends on the length of each board. Board length can expand in hot weather approximately 1-2 mm per 1 m of the board. So, if you have a 4-meter boards, you must leave expansion gap for minimum 6 and maximum 8 mm.

3. TERRACE FLOOR BOARDS INSTALLATION.
Eco Terrace offers fixing clips for terrace floor board installation and stainless-steel screws. For screwing the screw, only Torx 15T-type caps or screwdrivers can be used. Metal start/end clips are used to install the first and end board.
Stainless-steel screw 4 x 40, Stainless-steel screw 3 x 25, ECO-FIX WPC assembly clip, Start/end metal clip.

Side board installation.
Side board is fixed using the start/end metal clips. They are bolted to the base end of the rails with stainless-steel screw 3 x 25. If the main structure support rails are made from other materials and are another shape, then metal clips must be bolted to the supporting structure outer edge, on each bearing profile/beams midline.
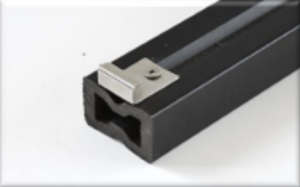
Side board groove must be placed in start/end metal clip. To make it easier, we recommend you keep the side board in 45-degree angle (1), place it in the start/end of a clip, and then (2) place the board in a normal position.

Attaching the next board, using ECO-FIX plastic clips.
ECO-FIX
fixing clips must be placed in board`s groove so that they are in the middle on the support rail. Bolt the first clip to the stainless-steel screw 4×40, but do not attach very hard. Board must be moveable under this clip.
Keeping the next board in a little angle, the groove must go in the already fixed clip. Make sure that the board is not pushed with force to the clip as it must be fixed without any strength. Next clip must be screwed into the opposite side of the board, but not too tight. After that, the first board clips must be fixed to normal fixing position and first board must not move.
Final board fixing.
Between final board and stationary objects (such as house wall) the gap of 5 mm must be left. Also, such distance must be left between rail and stationary objects.
4. TERRACE SIDE OF ENDING COVERING
The skirting board must be maintained with stainless steel screws 3 x 25 screwing them to rails or to board, depending on which side will be skirted. To make the screw remain invisible, we suggest making space for the screw head by drilling a little groove.
5. CLEAN UP SUGGESTIONS AFTER INSTALLATION PROCESS
After successful finishing of terrace installation, it is necessary to clean the new terrace. Please note the following cleaning instructions:
1. Wipe terrace surface from big debris or dirt using standard cleaning brush.
2. Wash the terrace surface with clean water. Be sure that the entire terrace surface is cleaned from all installation debris and accessories.
3. Using standard washing brush or soft fabrics and warm soap water, carefully wash the entire terrace surface.
4. Let the surface of the terrace dry out and check the entire surface for dirty spots or any scratches, which could appear during the installation process.
5. If necessary, repeat washing with warm soap water. Please use only washing detergents which are solvent free.
Your opinion will help us improve the quality of the production and installation process.